yuuhei's Home


  • 首页

  • 归档

  • 标签

关于ES6的几个新的关于[[Prototype]]的几个API

发表于 2018-01-15

Object.create()应用

1
2
3
4
5
6
7
8
9
10
11
12
/* Object.create(obj)会将[[prototype]]关联到指定对象,组合继承就由于这个原理 */
/* 面向委托模式来源于Object.create()这个特性 */
let obj = {
a: 123,
cool: function(){
console.log('cool!')
}
}

let obj2 = Object.create(obj);
console.log(obj2.a) // 123
console.log(obj2.cool()) // 'cool!'

proto 和 Object.getPrototypeOf() 应用

1
2
3
4
5
6
7
8
9
10
11
12
13
14
15
16
17
18
19
/* 组合继承 */
let Foo = function(name) {
this.name = name;
};

let Bar = function(name, age) {
/* 绑定父亲的构造属性 */
Foo.call(this, name);
this.age = age;
};

/* 将Bar的[[prototype]]关联到Foo的,继承Foo的原型链属性 */
Bar.prototype = Object.create(Foo.prototype);

/* ES6直接获取一个对象的[[prototype]]的方式 */
console.log(Object.getPrototypeOf(bar) === Bar.prototype);
/* 绝大多数浏览器(非标准获取方式)支持 */
console.log(bar.__proto__ === Bar.prototype);

instanceof 应用

1
2
3
4
5
6
7
8
9
10
11
12
13
14
15
16
17
18
function Foo() {}

function Bar() {
Foo.call(...)
}

Bar.prototype = Object.create(Foo.prototype)

let bar = new Bar()

/* 构造函数之间Foo和Bar的instanceof */
Bar.prototype instanceof Foo; // true

/* 继承可以通过instanceof找到源头 */
console.log(bar instanceof Foo); // true

/* 注意以下instancof用法是错的,不要混淆了 */
Bar instanceof Foo // false

instanceof一般用于确定一个值是哪种引用类型,是否存在于参数 object 的原型链上。而不是用于判断对象的构造函数,判断构造函数还是需要使用constructor,实例对象.constructor === 构造函数名字来判断

array,function对象instanceof Object会返回true,因为他们的引用都来自Object

.prototype.isPrototypeOf() 应用

1
2
3
4
5
6
7
8
9
10
11
12
13
14
15
16
17
18
19
20
21
22
23
24
25
26
27
28
/* 内省 */
let Foo = function(name) {
this.name = name;
};

let Bar = function(name, age) {
Foo.call(this, name);
this.age = age;
};

Bar.prototype = Object.create(Foo.prototype);

let bar = new Bar('yuuhei', 23);

// 首先要纠正错误,Bar instanceof Foo是错的

/* 构造函数之间Foo和Bar的内省 */
Bar.prototype instanceof Foo; // true
Object.getPrototypeOf(Bar.prototype) === Foo.prototype; // true
Foo.prototype.isPrototypeOf(Bar.prototype); // true

/* 实例和构造函数之间的内省 */
bar instanceof Bar; // true
bar instanceof Foo; // true
Object.getPrototypeOf(bar) === Bar.prototype; /// true
Foo.prototype.isPrototypeOf(bar); // true
Bar.prototype.isPrototypeOf(bar); // true

Object.setPrototypeOf()继承应用

1
2
3
4
5
6
7
8
9
10
/* ES6拥有Object.setPrototypeOf进行原型链继承 */
let Foo = function() {};
Foo.prototype.a = 1;

let Bar = function() {};

Object.setPrototypeOf(Bar.prototype, Foo.prototype);

let bar = new Bar();
console.log(bar.a); // 1

JS各种完美继承方案及其应用

发表于 2018-01-15

ES5组合继承方案(首选)

1
2
3
4
5
6
7
8
9
10
11
12
13
14
15
16
17
18
19
20
21
22
23
24
25
26
27
28
var Parent = function (name, age) {
this.name = name
this.age = age
this.say = function () {
console.log('say from parent constructor')
}
}
Parent.prototype.sayALL = function () {
console.log('sayALL from parent prototype')
}
// 完美继承
var Child = function (name, age, type) {
// 调用父元素构造函数
Parent.apply(this, [name, age])
this.type = type
}
// Object.create(..)它会创建一个对象并把这个对象的[[Prototype]]关联到指定的对象
Child.prototype = Object.create(Parent.prototype)
// 这里直接赋值会造成constructor在实例中能在原型链上被枚举
Child.prototype.constructor = Child
/* 可选,通过以下方式使constructor不能被枚举 */
Object.defineProperty(Child.prototype, 'constructor', {
writable: false,
enumerable: false,
configurable: false,
value: Child
})
var Child = new Child('yuuhei', '23', 'Child')

ES5寄生组合继承方案(候选)

1
2
3
4
5
6
7
8
9
10
11
12
13
14
15
16
17
18
19
20
21
22
23
24
25
26
27
28
29
30
31
var Parent = function (name, age) {
this.name = name
this.age = age
this.say = function () {
console.log('say from parent constructor')
}
}
Parent.prototype.sayALL = function () {
console.log('sayALL from parent prototype')
}
// 完美继承
var Child = function (name, age, type) {
// 调用父元素构造函数
Parent.apply(this, [name, age])
this.type = type
}
// 重点
var Super = function () {}
Super.prototype = Parent.prototype
// 这时候Super实例化就没有Parent的构造函数的内容了
Child.prototype = new Super()
// 这里直接赋值会造成constructor在实例中能在原型链上被枚举
Child.prototype.constructor = Child
/* 可选,通过以下方式使constructor不能被枚举 */
Object.defineProperty(Child.prototype, 'constructor', {
writable: false,
enumerable: false,
configurable: false,
value: Child
})
var Child = new Child('yuuhei', '23', 'Child')

ES6的class实现继承方案(首选)

1
2
3
4
5
6
7
8
9
10
11
12
13
14
15
16
17
18
19
20
21
22
23
24
class Parent {
constructor(name, age) {
this.name = name
this.age = age
}
say() {
return 'this is parent'
}
}

// ES6语法糖继承
class Child extends Parent {
constructor(name, age, type) {
// super必须放在第一行
super(name, age)
this.type = type
}
sayChild() {
// 利用super调用父构造函数
return super.say()
}
}

var children = new Child('yuuhei', 23, 'child')

class扩展阅读参考(伪多态等)

1
2
3
4
5
6
7
8
9
10
11
12
13
14
15
16
17
18
19
20
21
22
23
24
25
26
27
28
29
30
31
32
33
34
35
36
37
38
39
40
41
42
43
44
45
46
47
48
49
50
51
52
53
54
55
56
57
58
59
60
61
62
63
64

/* Orbment.prototype.call(this, ...)是伪多态 */
class Orbment {
constructor(name) {
this.name = name || 'Orbment';
this.message = null;
}
setSize(width, height) {
this.width = width || 50;
this.height = height || 50;
this.message = `The ${this.name} `;
}
getMessage() {
return this.message;
}
}

class ENIGMA extends Orbment {
constructor(name, width, height) {
// super()在constructor必须在this调用前执行
super(name);
this.width = width || 50;
this.height = height || 50;
}
setSize(width, height) {
// 以前的伪多态写法:Orbment.prototype.setSize.apply(this, [width, height])
// 注意你不知道的javascript出版书上的super(width, height)在constructor外使用已被禁止,改为替换以下方式实现相对多态
// 对父元素的setSize的基础上进行重写
super.setSize(width, height);
this.message += `size is width ${this.width} and height ${this.height}`;
return this;
}
}

class ARCUS extends Orbment {
constructor(name, width, height) {
// super()在constructor必须在this调用前执行
super(name);
this.width = width || 50;
this.height = height || 50;
}
setSize(width, height) {
// 以前的伪多态写法:Orbment.prototype.setSize.apply(this, [width, height])
// 注意你不知道的javascript出版书上的super(width, height)在constructor外使用已被禁止,改为替换以下方式实现相对多态
// 对父元素的setSize的基础上进行重写
super.setSize(width, height);
this.message += `size is width ${this.width} and height ${this.height}`;
return this;
}
}

let ENIGMA_I = new ARCUS('ENIGMA_I');
let ENIGMA_I_SIZE_MESSAGE = ENIGMA_I
.setSize()
.getMessage();

let ARCUS_I = new ARCUS('ARCUS_I');
let ARCUS_I_SIZE_MESSAGE = ARCUS_I
.setSize(100, 70)
.getMessage();

console.log(ENIGMA_I_SIZE_MESSAGE);
console.log(ARCUS_I_SIZE_MESSAGE);

移动端常用元素等比缩放原理

发表于 2018-01-15

原理

使用伪元素进行百分比撑高,假如元素在设计稿的尺寸是100x150,那么伪元素的paddingTop就填充高/宽度,也就是150/100 * 100%,即可等比缩放。

HTML结构

1
2
3
4
5
6
<div class="test">
<div class="inner"><div class="item">1</div></div>
<div class="inner"><div class="item">2</div></div>
<div class="inner"><div class="item">3</div></div>
<div class="inner"><div class="item">4</div></div>
</div>

CSS

1
2
3
4
5
6
7
8
9
10
11
12
13
14
15
16
17
18
19
20
21
22
23
24
25
26
27
28
29
30
31
32
/* 元素等比缩放方案 */
.test {
font-size: 0;
}

.test .inner {
display: inline-block;
width: 25%;
vertical-align: top;
position: relative;
background-color: rgba(255, 0, 0, .5);
}

.test .inner .item {
position: absolute;
top: 0;
right: 0;
bottom: 0;
left: 0;
}

.test .inner:before {
content: "";
display: inline-block;
padding-bottom: 100%;
width: .1px;
vertical-align: top;
}

.test .inner:nth-child(2n) {
background-color: rgba(0, 0, 0, .5);
}

前端切图技巧汇总

发表于 2018-01-13

部署PS环境

  • 下载PS cs6 Extended 64位 正版破解版
  • 视图/显示/智能参考线以及视图/字符,这两个都要选上
  • 窗口/信息;窗口/字符,两个打开,其他的多余的可不需要,将前面的勾取消
  • 点击信息面板那一个小三角,打开面板选项/标尺单位:像素;两个像素模式:RGB颜色和WEB颜色;文档尺寸选上,然后确定
  • 编辑/首选项/单位与标尺【标尺:像素;文字:像素,其他默认不用改动】这样的做的好处:在PS里打开一个网页,随便点击哪个图片或者某个字符,就可以知道详细的信息
  • 窗口/工作区/新建工作区/名称:web切图,后两个选上,然后点击存储,这样就可以保存下来,防止丢失了。右上角可以更换,窗口-工作区可以复位。这样就可以储存基本布局和快捷键
  • 右边区域需要的窗口有:图层、历史记录、信息、字符。单位全部改成像素

技巧篇

  • 使用markman进行psd设计稿的标注
  • PS切图尽量使用图层切图。图层切图步骤:首先在图层查找到需要提出来的组(快速选择用ctrl+选择单击),然后对着组右键合并组,然后对着组ctrl+单击,选中图像,这时候psd里会出现虚线,然后ctrl+c复制,文件新建(必须先复制图层,再新建,这样就会默认有图层的尺寸),直接确认,然后ctrl+v粘贴,将另一个多余的图层删去,然后保存。无法合并的图层一般需要栅格化文字或栅格化图层后才能合并
  • 给新建的透明背景添加背景颜色方便移位(如果没有则在右下角垃圾桶图左边的地方有一个新增图层)方法:一个是选中图层后,单击图层选项卡,选择新建填充图层,纯色,然后选择颜色;第二个是选定好左边菜单栏右下角的颜色,然后选中图层,按快捷键ctrl + backspace进行填充对应颜色
  • 如何进行多个图层选中,不用一个一个点:先在需要选中多个图层的附近按着V,点击鼠标看看有没有图层移动,如果有移动的话就点一下图层窗口的锁定。然后在用方框选中后,再用移动工具移动,会发现几个图层都会同时移动了
  • 使用切片工具后,点击ctrl+shift+alt+s弹出保存框,将区域缩放到最小,然后鼠标按着选中区域,这时候再点击右上角的输出格式,就能够全部切片都按照这个格式切出去了,如果是一个个不同的需要点击对应切片,在选中格式即可
  • 有矢量智能对象(AI弄的),需要分割一个个图片,需要对其右键,选择栅格化图层,然后使用选择工具选中在剪切黏贴,这样就可以像其他图层一样使用了
  • 字体图层也需要栅格化后才能合并图层
  • 将一个图层的颜色全部换成想要的颜色:在图层上按着alt+鼠标往上移,建立副本图层,图层选项卡双击图层空隙,选中颜色叠加,改变颜色后隐藏以前的图层即可换颜色
  • 快捷键alt + 滚轮可以放大缩小图像

JS简单碰撞原理

发表于 2018-01-09

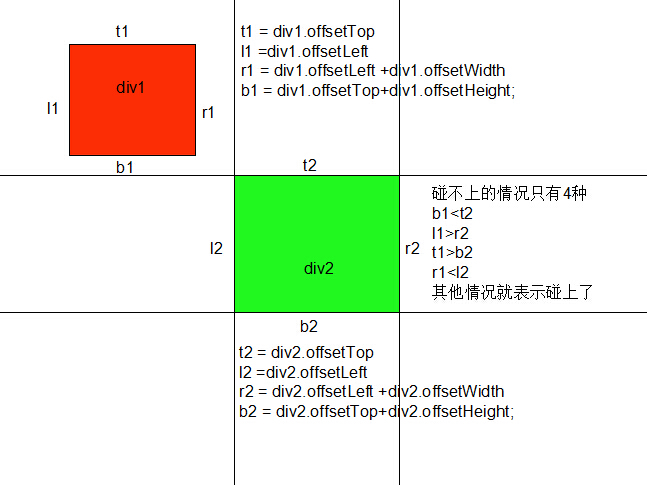
先看分析图:
碰撞原理

  • 当div1在div2的上边线(t2)以上的区域活动时,始终碰不上

  • 当div1在div2的右边线(r2)以右的区域活动时,始终碰不上

  • 当div1在div2的下边线(b2)以下的区域活动时,始终碰不上

  • 当div1在div2的左边线(r2)以左的区域活动时,始终碰不上

除了以上四种情况,其他情况表示div1和div2碰上了,下面试完整测试代码

阅读全文 »

工作时制作移动端的技巧

发表于 2017-11-21

简单的利用JS来判断页面是在手机端还是在PC端打开的方法

1
2
3
4
5
if(/Android|webOS|iPhone|iPod|BlackBerry/i.test(navigator.userAgent)) {
window.location.href = "https://www.baidu.com/";
} else {
window.location.href = "http://news.baidu.com/";
}

在微信浏览器关闭当前页面的方法

  • 需要在微信公众号签名才能够使用
1
WeixinJSBridge.call('closeWindow')

移动端图片模糊的问题

  • 在移动端需要使用PC端两倍尺寸的图片,然后用background-size:50%;来还原本来的尺寸,这样移动端的图片才会清晰,不模糊
阅读全文 »

JS函数节流和函数去抖和分时函数

发表于 2017-07-21

函数节流throttle.js

我们这里说的throttle就是函数节流的意思。再说的通俗一点就是函数调用的频度控制器,是连续执行时间间隔控制。主要应用的场景比如:

  • 鼠标移动,mousemove 事件
  • DOM 元素动态定位,window对象的resize和scroll 事件
  • 定时器版:
1
2
3
4
5
6
7
8
9
10
11
12
13
14
15
16
17
18
19
20
21
22
23
var throttle = function(fn, interval) {
var timer,
firstTime = true;

return function(...args) {
var _this = this;

if (firstTime) {
fn.apply(_this, args);
return firstTime = false;
}

if (timer) {
return false;
}

timer = setTimeout(function() {
clearTimeout(timer);
timer = null;
fn.apply(_this, args);
}, interval || 200);
}
}
  • 时间戳版
1
2
3
4
5
6
7
8
9
10
11
12
13
var throttle = function(fn, interval) {
var previous = 0;

return function(...args) {
var now = +new Date();
var _this = this;

if (now - previous > interval) {
fn.apply(_this, args);
previous = now
}
}
}

函数去抖debounce.js

debounce和throttle很像,debounce是空闲时间必须大于或等于 一定值的时候,才会执行调用方法。debounce是空闲时间的间隔控制。比如我们做autocomplete,这时需要我们很好的控制输入文字时调用方法时间间隔。一般时第一个输入的字符马上开始调用,根据一定的时间间隔重复调用执行的方法。对于变态的输入,比如按住某一个建不放的时候特别有用。
debounce主要应用的场景比如:

  • 文本输入keydown 事件,keyup 事件,例如做autocomplete
1
2
3
4
5
6
7
8
9
10
11
12
13
14
var debounce = function(fn, interval) {
var timer

return function(...args) {
var _this = this;

if (timer) {
clearTimeout(timer);
}
timer = setTimeout(function() {
fn.apply(_this, args);
}, interval);
}
}

用法:

1
2
3
4
5
6
7
document.addEventListener('mousemove', debounce(function() {
console.log(this)
}, 500));

document.addEventListener('mousemove', throttle(function() {
console.log(this)
}, 500));

额外性能优化方案:分时函数

1
2
3
4
5
6
7
8
9
10
11
12
13
14
15
16
17
18
19
20
21
22
23
24
25
26
27
28
29
30
31
32
33
34
// 分时函数,避免一次加载过多数据,类似好友列表
var timeChunk = function(array, fn, count, interval) {
var obj,
timer

var start = function() {
for (var i = 0; i < Math.min(count || 1, array.length); i++) {
obj = array.shift();
fn(obj)
}
}

return function() {
timer = setInterval(function() {
if (array.length === 0) {
return clearInterval(timer);
}
start();
}, interval || 200);
}
}

var friendList = [];
for (var i = 0; i < 100; i++) {
friendList.push({ id: i });
}

var renderFriendList = timeChunk(friendList, function(item) {
var div = document.createElement('div');
div.innerHTML = item.id;
document.body.appendChild(div);
}, 10);

renderFriendList();

JS实现Ajax和Jsonp

发表于 2017-07-13

一、JS原生AJAX

ajax:一种请求数据的方式,不需要刷新整个页面;

ajax的技术核心是 XMLHttpRequest 对象;

ajax 请求过程:创建 XMLHttpRequest 对象、连接服务器、发送请求、接收响应数据;

封装基本ajax函数:

1
2
3
4
5
6
7
8
9
10
11
12
13
14
15
16
17
18
19
20
21
22
23
24
25
26
27
28
29
30
31
32
33
34
35
36
37
38
39
40
41
42
43
44
45
46
47
48
49
50
51
52
53
54
55
56
57
58
59
60
61
62
63
64
65
66
67
68
69
70
71
72
73
74
75
// 普通回调
function ajax(options) {
options = options || {};
options.data = options.data || {};

// 请求方式,默认是GET
options.type = (options.type || 'GET').toUpperCase();
// 避免有特殊字符,必须格式化传输数据
options.data = formatParams(options.data);
var xhr = null;

// 实例化XMLHttpRequest对象
if (window.XMLHttpRequest) {
xhr = new XMLHttpRequest();
} else {
// IE6及其以下版本
xhr = new ActiveXObjcet('Microsoft.XMLHTTP');
};

// 监听事件,只要 readyState 的值变化,就会调用 readystatechange 事件
xhr.onreadystatechange = function () {
// readyState属性表示请求/响应过程的当前活动阶段,4为完成,已经接收到全部响应数据
if (xhr.readyState == 4) {
var status = xhr.status;
// status:响应的HTTP状态码,以2开头的都是成功
if (status >= 200 && status < 300) {
var response = '';
// 判断接受数据的内容类型
var type = xhr.getResponseHeader('Content-type');
if (type.indexOf('xml') !== -1 && xhr.responseXML) {
response = xhr.responseXML; //Document对象响应
} else if (type === 'application/json') {
response = JSON.parse(xhr.responseText); //JSON响应
} else {
response = xhr.responseText; //字符串响应
};
// 成功回调函数
options.success && options.success(response);
} else {
options.error && options.error(status);
}
};
};

// 连接和传输数据
if (options.type == 'GET') {
// 三个参数:请求方式、请求地址(get方式时,传输数据是加在地址后的)、是否异步请求(同步请求的情况极少);
xhr.open(options.type, options.url + '?' + options.data, true);
xhr.send(null);
} else {
xhr.open(options.type, options.url, true);
//必须,设置提交时的内容类型
xhr.setRequestHeader('Content-Type', 'application/x-www-form-urlencoded; charset=UTF-8');
// 传输数据
xhr.send(options.data);
}


//格式化参数
function formatParams(data) {
var arr = [];
for (var name in data) {
// encodeURIComponent() :用于对 URI 中的某一部分进行编码
arr.push(encodeURIComponent(name) + '=' + encodeURIComponent(data[name]));
};
// 添加一个随机数参数,防止缓存
arr.push('v=' + random());
return arr.join('&');
}

// 获取随机数
function random() {
return Math.floor(Math.random() * 10000 + 500);
}
}
1
2
3
4
5
6
7
8
9
10
// 调用
ajax({
url: 'test.php', // 请求地址
type: 'POST', // 请求类型,默认"GET",还可以是"POST"
data: { 'b': '异步请求' }, // 传输数据
success: function (res) { // 请求成功的回调函数
console.log(JSON.parse(res));
},
error: function (error) { } // 请求失败的回调函数
});
阅读全文 »

JS开发datepicker

发表于 2017-05-21

基础知识

首先,需要知道new Date()这个参数的基本使用:

  • 传入new Date(2017, 4, 20),的时候,由于月份的索引是从0-11的,所以,传入2017, 4, 20的时候,实际的显示的月份是2017年5月20日
  • 月份和日期位会自动进位和退位,例如月份位小于0大于11,日期位等于小于0和大于本月日期数
  • 拿到当月第一天是这样写的:new Date(year, month-1, 1)
  • 拿到当月最后一天是这样写的:new Date(year, month, 0)
  • .getDay()获取的的是这个日期的星期几,星期一~星期天对应[1, 2, 3, 4, 5, 6, 0]

其次,需要知道js的一些新的API:

  • document.querySelector()获取的是CSS选择器,即传入的参数是’.exampleClass’或’.#exampleID’,需要将字符串传进去,获取的就是第一个匹配的class
  • 如果想获取多个同class的CSS选择器,使用document.querySelectorAll
  • $element.classList.add()可以添加class
  • $element.classList.remove()可以移除特定class
  • $element.dataset.xx可以访问到dom元素里自定义属性data-xx,返回的值就是xx
  • 注意好编码习惯,例如一个dom元素起名就用$开头,如$wrapper

开发思路

阅读全文 »

JS正则匹配日期自定义格式化

发表于 2017-05-19

利用改原型编写

1
2
3
4
5
6
7
8
9
10
11
12
13
14
15
16
17
18
19
20
21
22
23
24
// 对Date的扩展,将 Date 转化为指定格式的String
// 月(M)、日(d)、小时(h)、分(m)、秒(s)、季度(q) 可以用 1-2 个占位符,
// 年(y)可以用 1-4 个占位符,毫秒(S)只能用 1 个占位符(是 1-3 位的数字)
// 例子:
// (new Date()).Format("yyyy-MM-dd hh:mm:ss.S") ==> 2006-07-02 08:09:04.423
// (new Date()).Format("yyyy-M-d h:m:s.S") ==> 2006-7-2 8:9:4.18
Date.prototype.Format = function (fmt) { //author: meizz
var o = {
"M+": this.getMonth() + 1, //月份
"d+": this.getDate(), //日
"H+": this.getHours(), //小时
"m+": this.getMinutes(), //分
"s+": this.getSeconds(), //秒
"q+": Math.floor((this.getMonth() + 3) / 3), //季度
"S": this.getMilliseconds() //毫秒
};
if (/(y+)/.test(fmt)) fmt = fmt.replace(RegExp.$1, (this.getFullYear() + "").substr(4 - RegExp.$1.length));
for (var k in o)
if (new RegExp("(" + k + ")").test(fmt)) fmt = fmt.replace(RegExp.$1, (RegExp.$1.length == 1) ? (o[k]) : (("00" + o[k]).substr(("" + o[k]).length)));
return fmt;
}

var time1 = new Date().Format("yyyy-MM-dd");
var time2 = new Date().Format("yyyy-MM-dd HH:mm:ss");
<i class="fa fa-angle-left"></i>1…456<i class="fa fa-angle-right"></i>

56 日志
14 标签
GitHub
© 2023 Sellenite
由 Hexo 强力驱动
主题 - NexT.Mist